Filed under: Canvas Master Craftsman Program, Embroidery Guild of America, Step 1
I got started on the Canvas Master Craftsman Certification Program through EGA (https://egausa.org/certifications/master-craftsman-program/) in September 2019 with Step 1. I am also interested in the Color and Design Certification Programs. But, I decided to start with the Canvas program in order to demonstrate “mastery of basic canvas techniques and compensation” before advancing. And, I am thrilled to say that I passed the Step 1 evaluation with distinction! They want me to exhibit it as “an example of the beautiful work” being done as part of the Master Craftsman Program portion of the Education exhibit at the 2020 EGA National Seminar, September 4-8. I am happy to promote the program.
Since each program has 6 steps with judging at 6-month intervals, it’ll take a minimum of 3 years per program. But, you can take longer periods to complete any step. By the end of the 3 programs, I will have stitched 21 pieces and written 6 essays for the Color program (these sound tougher than stitching). While this is ambitious and challenging, it is just what I want. Even though I didn’t get started on my first piece until September, I was able to get it done before the end of October and send it in for the November evaluation. It appears that 3 people did the evaluation which looks at following directions, transferring the design, stitch technique, stitch placement, correct compensation, canvas coverage, and use of color.
For step 1 of Canvas, I had to select 10 stitches from a list of 20 and one of three designs using a monochromatic color scheme of 5 values of stranded cotton floss.
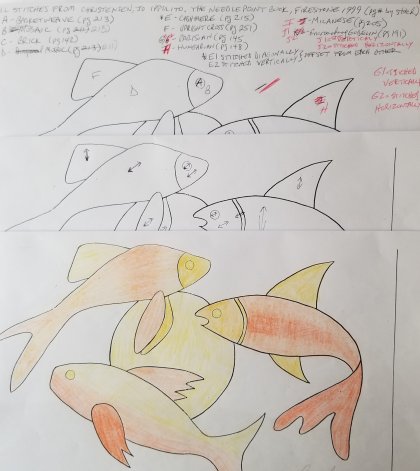
I selected the three fish mainly because I could use 5 values in the monochromatic color range that DMC calls Golden Yellow (3078, 727, 726, 725, and 972). After I made multiple copies of the design, I pulled out my colored pencils and mapped out the basic colors to be sure there would be contrast between adjacent areas and to get an idea of some different shading for each fish.
Next, I decided what direction each area would be. And, I wanted movement that would keep your eye within the piece. I selected Mosaic for what I saw as the furthest away fish (upper left) because it is a smaller stitch pattern, Parisian for the middle fish (right) because I could rotate the stitch 90 degrees for the tail which is showing the backside of the fin, and Milanese for the closest fish (bottom left) because it is the largest stitch pattern. Then, I filled in the rest of the areas.
For my initial tracing, I used a yellow copic marker but I couldn’t see the lines well enough. So, I got another piece of canvas and used a pencil even though I don’t like pencil. It either rubs away on me or it is too dark to cover with the light colored threads. As it turns out, one negative comment was that the lighter threads in some places picked up the graphite. Or, it might be that I didn’t cover the tracing quite enough in a couple of places. They offered two suggestions including colored pencils or micron pens which come in different sizes and colors.
I was pleased they noted my threads were “very nicely laid with good tension”. My coverage was good but “a small amount of canvas is visible in some areas”. I liked the coverage with 3 or 4 threads. But, I can appreciate their suggestion to use more strands on the straight stitches to cover even more. They also offered a good alternative to use paint behind the stitches. I wasn’t sure that was allowed but now I know it’s ok.
I planned out the thread blending on the bodies of each fish and they noticed. “Color blending added interest and the transition of values, particularly in the upper left fish, is excellent.” That fish had the most complicated thread blending pattern. And, they loved the way I turned the stitch on the right fish’s fin to add movement. It’s nice to read that my submission was “artfully done” and that the color blending and stitch placement, especially on the fin were appreciated.

An extensive bibliography is provided and, as a guide, each entry references which step it applies to. I own about 10 of the books. And, Rittenhouse Needlepoint has another 6 in their classroom library. I came to appreciate the stitching order as suggested in The Needlepoint Book by Jo Ippolito Christensen. She indicates that slanted stitches should be stitched first when next to straight stitches.
Step 2 instructions were included when Step 1 was returned to me and I am already planning what stitch goes where in the assigned geometric design. My analogous colorway with DMC floss has been determined. Color placement is tough. While I am anxious to get started, I am not in a rush as I have until May. And, there is a painted canvas that I must finish first.
4 Comments so far
Leave a comment

Congrats Melita! I am always so impressed with your stitching.
Comment by dmbstitch November 24, 2019 @ 4:30 pmI’ll have to learn more about this program when I see you.
I’ll be going to Keystone in December. We can talk at dinner if you can go.
Comment by melitastitches4fun November 24, 2019 @ 5:23 pmThis is great Melita! I can’t wait to see the next piece, and read about how you approach it. I’m excited to follow you on this journey.
Comment by Joyce Pugh November 24, 2019 @ 10:40 pmGlad you’re finding the approach of interest. Thanks Joyce.
Comment by melitastitches4fun November 24, 2019 @ 11:32 pm